Moles may be small, but they can wreak havoc across a property in no time. Their underground activity leaves behind soft ridges in the grass, dirt mounds, and damaged root systems, making it clear that something is invading your yard. Once they begin tunneling, it becomes tough to manage the issue without installing a solution that directly blocks their path.
Underground barriers offer a long-lasting way to keep moles out. These physical walls go below the soil, making it difficult—if not impossible—for moles to tunnel into target areas like gardens and plant beds. A proper mole barrier installation doesn’t hurt the animals but does protect your lawn from further destruction. If you want an option that works year-round, this method is one of the most effective choices.
Understanding Moles And Their Impact
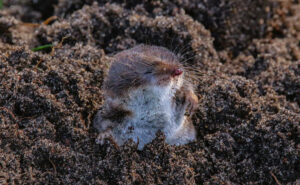
Moles live most of their lives below ground, digging constantly in search of bugs and insects. They create a network of shallow tunnels just beneath the surface, and this constant movement can lead to widespread lawn issues quickly. Even if only one or two moles are active in the area, the damage tends to multiply fast.
Here are common indicators that moles are digging under your property:
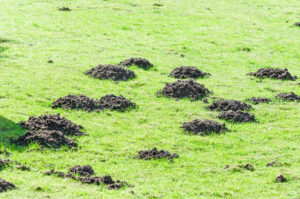
– Soft, uneven ground that feels spongy underfoot
– Dirt piled in small cone shapes across the yard or garden
– Yellowing patches of grass or drooping plants caused by disturbed roots
While moles aren’t after your plants for food, their digging has consequences for the entire landscape. Uprooted plants, dried-out patches, and exposed tunnel entrances aren’t just hard to look at—they also affect how safe and functional your yard is for your family and pets. Uneven ground can make maintenance and playtime a bit risky, especially if new tunnels pop up week after week.
Moles also create an opportunity for other critters, like voles, to follow their paths deeper into your yard. And unlike moles, voles do chew on roots, bulbs, and greenery. This makes the presence of moles doubly frustrating since their activity opens the door to even more problems.
Types Of Mole Barriers
Dealing with moles effectively means picking the right kind of barrier. Not every technique works the same, and your choice depends on your yard’s layout and how long you’d like the solution to last. There are three main types of mole barriers: physical, sonic, and electronic.
Physical barriers are usually the best bet. These include:
– Hardware cloth: A heavy-duty metal mesh that can be placed around garden beds or paths
– Steel sheeting: Durable and long-lasting when run alongside buildings or fences
– Mesh-covered landscaping fabric: A lighter option that helps support other control efforts
These are installed underground and block moles from being able to dig through. Once placed properly, they stay put for years and don’t need to be powered or monitored.
Sonic and electronic barriers work differently. They produce vibrations or sounds designed to bother moles enough to move them along. Some homeowners see quick improvement, but these devices aren’t always dependable. Moles may ignore them, soil conditions can affect performance, and they usually need regular attention or battery changes.
If you’re looking for a method that lasts long and doesn’t depend on guesswork, physical options stand out. Just make sure they’re deep and strong enough to handle determined digging behavior.
Steps To Install An Underground Mole Barrier
With the right material chosen, you’re halfway there. The second part—installing it properly—is just as important. If the barrier isn’t placed deep enough or if you leave open gaps, moles may find a way around it.
Start by walking your yard and deciding the zones that need the most protection. This could be a vegetable garden, flowerbeds, or frequently used paths. Once you know the coverage area, follow these steps:
1. Dig a trench at least 24 inches deep. Some yards with looser soil may need deeper trenches.
2. Line the trench with a strong material like hardware cloth or steel.
3. Extend the top edge of the barrier a few inches above ground level. This discourages moles that surface.
4. Bend the bottom edge outward at a 90-degree angle to form an L-shape. This helps stop moles from burrowing underneath.
5. Fill the trench back in and pack the soil firmly to hold the barrier in place.
It may take some time, especially in larger areas, but this investment typically pays off. Raised garden beds are perfect candidates for full enclosures. Wrapping them entirely with hardware cloth and anchoring it well below the soil surface keeps roots safe and limits future intrusions.
If you’re unsure about how deep to dig or what barrier type pairs best with your soil type, speak with a mole control expert familiar with your region. The best materials still won’t do their job if they’re not installed the right way.
Maintaining Your Mole Barrier
Getting the barrier in the ground doesn’t mean you’re finished. Keeping it effective takes some routine monitoring and basic upkeep. Over time, soil shifts, tree roots grow, and weather events can loosen or damage sections of the barrier.
Here are a few steps to keep it working year after year:
– Inspect the protected zones twice a year
– Watch for new tunnels or mounds nearby that may show barrier breaches
– Look for soft earth or new gaps that hint at washed-away soil or settling
– Patch damaged or weak spots right away using matching barrier material
– Plant ground cover or install mulch around the barrier edges to keep soil packed in place
Yards that are newly landscaped or recently regraded may need extra monitoring during the first year, as settling happens faster. After that, a quick seasonal check each spring and fall is usually enough.
If your barrier borders a fence or structure, use that spot as a visual reference and include it in your regular yard care circuit. It’s easy to glance at while mowing, raking, or tidying up around the house.
You can even make upgrades that double as visual appeal—adding stones, edging blocks, or low plants along the barrier lines makes them blend in better while offering one more layer of protection.
The Long-Term Payoff of Burying the Problem
Installing a mole barrier isn’t just a short-term fix. When done right, it can keep some of the most sensitive parts of your property protected from underground damage. You get to avoid the constant pattern of repairing soil, replacing plants, and re-leveling sunken areas.
Barrier installation works well around high-priority zones like lawns, gardens, patios, and walkways. While it won’t guarantee that moles never reach other parts of your yard, it gives you control where it matters most.
If moles have already made themselves at home, consider working with a professional to trap and remove them before installing anything. Stopping the current activity lets the barrier do its job without immediately getting challenged by a fresh wave of tunneling.
Once the ground is secure, the payoff becomes clear, and the peace of mind is noticeable. Protecting what you’ve planted and planned for is always worth the effort.
Protecting your yard from determined moles can transform how you enjoy your outdoor space. If you’re ready to take control, explore how mole barrier installation with Trap Your Moles can help defend your lawn from future mole disturbances, ensuring it remains pristine and safe for everyone.